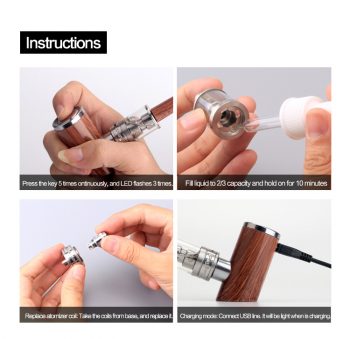
- Insert the coil into the tank
- Fill the tank with e liquid
- Re-assemble the tank
- Leave to soak for ten minutes
- Turn on with 5 quick clicks
- All set and ready to vape!

Inserting the coil into the Tank on the Kamry K1000 Plus from Petersham Pipes 
Filling the Tank on the Kamry K1000 Plus from Petersham Pipes 
Assembling the Tank on the Kamry K1000 Plus from Petersham Pipes 
Adding the Tank to the Kamry K1000 Plus from Petersham Pipes 
Adding the Stem to the Kamry K1000 Plus from Petersham Pipes 
Parts of the Kamry K1000 Plus from Petersham Pipes
The following videos and diagrams will help you get the most out of your Kamry K1000 plus e pipe. In our shop you will find coils and tanks and everything you need to keep it in perfect shape.
Before filling the pipe screw the atomizer coil supplied into the base of the tank, (if a coil is not already in place) then fill the tank as per the diagram below.